


How to use Time Stopper?
We recommend reading the guide before using the Time Stopper and watch the guide video for additional information.
Step Guide for Time Stopper
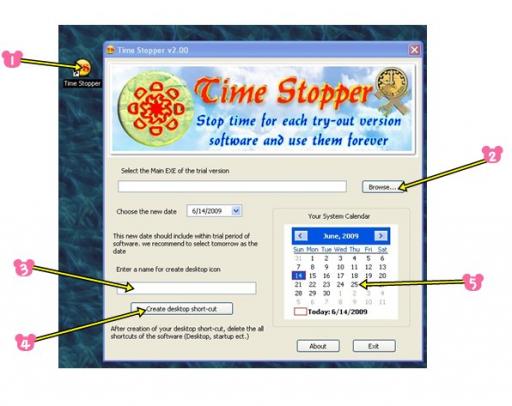
This image simply illustrates the steps to extend your software trial version with the help of Time Stopper.
Step 1
Open Time Stopper
Step 2
Click the Browse button and find the correct exe file which you need to extend the trial period. Select the main exe file and click the Open button on the dialog box. (Make sure to select the correct exe file, not the shortcut)
Step 3
Then click Choose the new date combo box and select a date. (We recommend to use the date of tomorrow as the new date for better results)
You can’t change the date from Your System Calendar view as it’s for view purposes only.
Step 4
Finally, you should create a Desktop shortcut for the software. Type a name for your trial version software (3) and click Create desktop shortcut (4) to create a shortcut in your desktop.
After completing these steps, you can open the extended trial version of your software using the Desktop shortcut created using the Time Stopper.
IMPORTANT
Make sure that you’re always using the Desktop shortcut created using the Time Stopper to open the software. If you open the main exe directly / from the Start menu or using a shortcut, you may not be able to use the Time Stopper to extend the trial period of that software again (for some software).
Therefore, we recommend deleting the original shortcut from your Desktop to prevent accidentally opening it.